
I’m about to teach you the hierarchy of fading targets.
E16, E32, E89, safety, (shadow)
There, that was my quickest lesson ever.
We listen to what Scott Barkley says, and we give consideration to his words, but we keep our opinion to ourselves: “it does not worth for banks to make a move smaller than 55 pips”.
We listen to what Macdulio says about the Eur/Usd’s daily volatility and store in the back of your mind that this instrument 80% of the time would average 80% of 80 pips (yet another Fibonacci number).
So now you should have a sense of what pip size to aim for given that you are not likely to get the top and the bottom of the day with your entries and exits.
We are going to use the signals of the Holy Graph in combination with the Stochastic Bars Hybrid to get the entries right.
3 of the 5 exits are easy to plot.
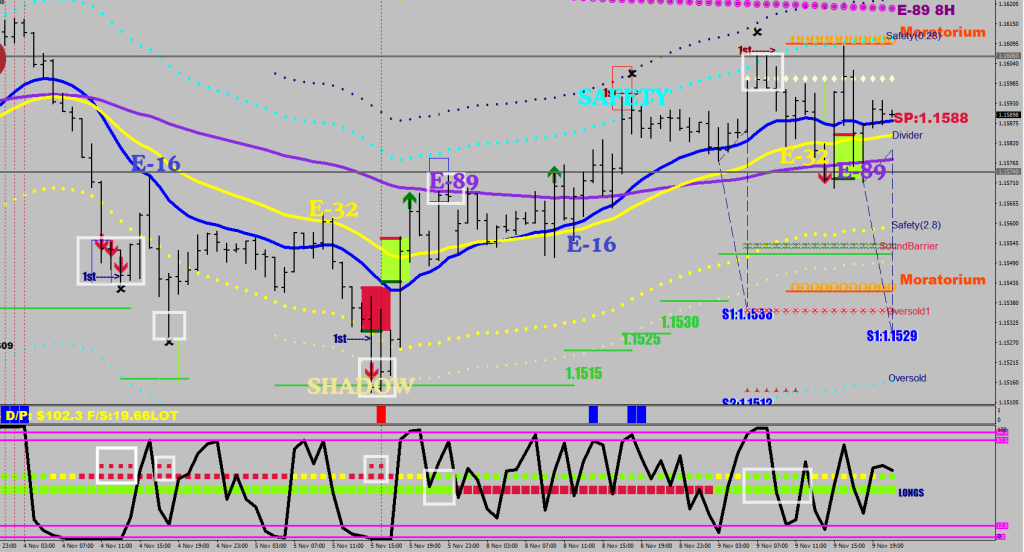
E-16 HL2 (the Suppressor) is in Blue
E-32 HL2 (the Divider) is in Yellow
and E-89 HL2 (Leon, the Pro) is in Indigo
The Safety lines are 28-pip displacements of the E-32, so you would need a routine to plot these
and the Shadow lines are an additional 10 pips further away
So here is the LT (lieutenant) version of the Holy Graph. It was dumbed down a bit (less cluttered).
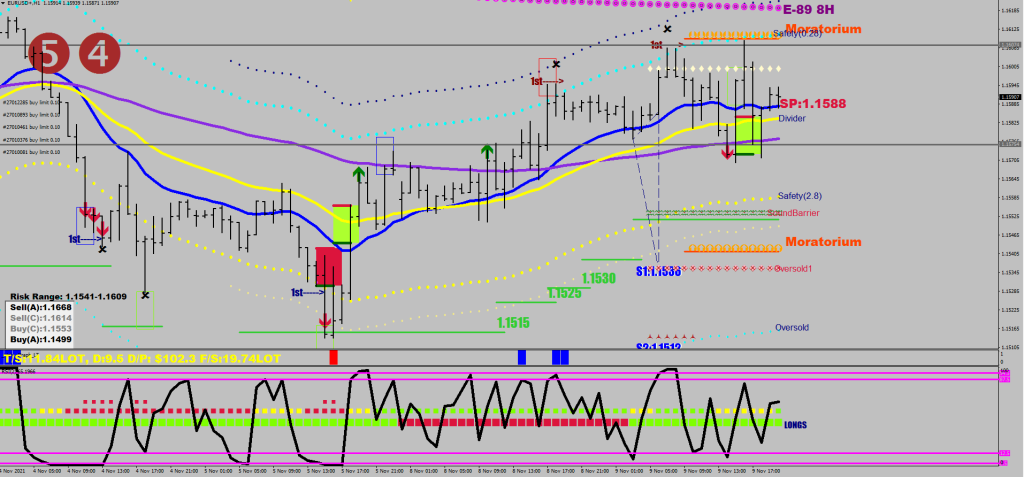
Yes, I left in the Forest, the 4H overbought / oversold levels, and a bunch of other stuff. You only need to pay attention to the dotted lines, the moving averages and the 3 rows of cubes printed onto the RSI below.
Without going into details about the algo of the large squares (send functions, faith healers, E207 and E67 crosses), here is the plotter of the 3 rows:

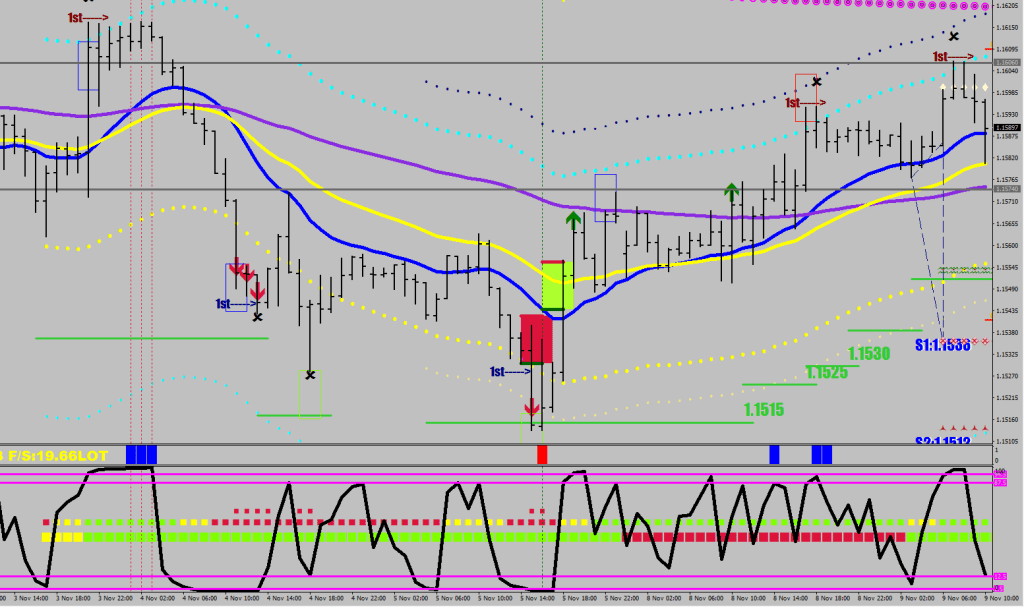
First, the easiest signals, the instant sells / buys.
When you have 2 squares of the same color and the Stochastic Bars Hybrid has a corresponding peak signal, that’s an immediate buy/sell signal and the targets are the safety and the shadow lines at the opposite end (vertical lines).
 for (i=100; i>=0; i--){
  if ((High[i]>E32[i]+380*Point || ESW[i]>0) && dir[i]>0 && ExtMapBuffer3[i]!=EMPTY_VALUE)
   {
    ObjectCreate("I-"+IntegerToString(i),OBJ_VLINE,0, Time[i], 1);
                  ObjectSet("I-"+IntegerToString(i),OBJPROP_COLOR,clrCrimson );
                  ObjectSet("I-"+IntegerToString(i),OBJPROP_WIDTH,1);
                  ObjectSet("I-"+IntegerToString(i),OBJPROP_STYLE,STYLE_DOT);
                  ObjectSet("I-"+IntegerToString(i),OBJPROP_BACK,1);

   }


    if ( (Low[i]<E32[i]-380*Point && ESW[i]<0) && ExtMapBuffer2[i]!=EMPTY_VALUE )
   {
    ObjectCreate("I--"+IntegerToString(i),OBJ_VLINE,0, Time[i], 1);
                  ObjectSet("I--"+IntegerToString(i),OBJPROP_COLOR,clrDarkGreen );
                  ObjectSet("I--"+IntegerToString(i),OBJPROP_WIDTH,1);
                  ObjectSet("I--"+IntegerToString(i),OBJPROP_STYLE,STYLE_DOT);
                  ObjectSet("I--"+IntegerToString(i),OBJPROP_BACK,1);

   }
}
Now, pay attention to the double reds and double greens.

These white blocks highlight a swing low / swing high.
Your job as a trader to put out pending orders beyond the qualified swing as follows.
Say you trade 10 lots.
For the next 10 pips, you put out 1 lot each.
Target the next support based on the shown hierarchy.
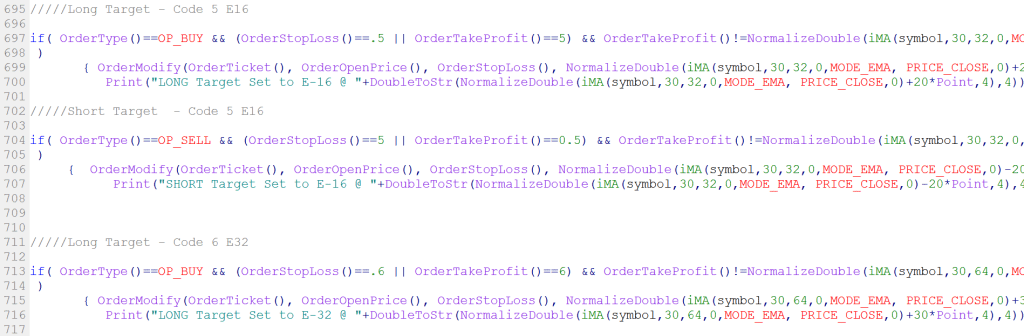
I made my choice long time ago to trade like the house. This does not allow for stop losses. I have targeting, trail stop and hedging for alternatives.
This is how my trail stop routine adjusts the target of a Code 5, Code 6, Code 9 etc open position.
Is the tape move… movin’?
