Hedging Blue Print for Auto Trading

There are two types of trading that may require hedging.
1. Investments
If you have long term holdings, your tolerance of draw down may be greater (I.e. conviction) and with this type of “trading” you may change direction and adjust your weighting accordingly. In this context overhedging does make sense, but graduality should still apply.
2. Short term trading
With short term trading, hedging is a last resort and one should try to avoid it.
Yet, it is something to prepare for and some parts of this additional system in place may contribute to your bottom line.
Auto trading is what I am engaging in. Every trade comes with stop losses, so what is this about?
The events to plan for are the following:
– How to handle a weekend gap prospect if you are still in an open position near the end of the week.
– What to do if the stop loss size was not selected well enough, and one individual position starts to put on too much drag (I.e. the draw down caused exceeds 5%).
– What to do if the simultaneously opened positions impose a greater draw down or even a margin call threat?
– How to prepare for possible human interactions such as waiving stop losses or opening positions without stop losses.
In order to prepare for auto-trade hedging, one has to figure out the final outcome first.
The final outcome is the reach of the maximum draw down.
I start with the following numbers:
Ratio hedging should happen in two steps;
When the total draw down exceeds 20%, which means that the equity to balance ratio drops below .8, half hedge should be clicked on at market and simultaneously all stop losses and targets should be eliminated  (except for the hedge itself) as well as all target prices and all trail stops and croppers should be suspended.
As additional protection measure, at .85% all orders placed in the more weighted direction should be halted.
Yet another measure would be at .75% all at market orders in the more weighted direction by auto trading routines to be halted (other than hedging of course).
When the equity to balance ratio drops to .7, a full hedge should be clicked on at market and all auto trading should be suspended asap.
This is where a human would have to salvage all positions at once and take the 30% loss.
To avoid ever getting into this situation, pro-active hedging could be made.
The automated version of this could do the following:
It could administer half hedges as follows:
In a bearish short term stance (below Mr. Maroon) upon reaching local peak overbought condition and showing excessive draw down (5%) a 50% short hedge could be put on with no target, but with a stop.
In a bullish short term stance (above Mr. Maroon) upon reaching local peak oversold condition and showing excessive draw down (5%) a 50% long hedge could be put on with no target, but with a stop.
The rationale behind this proactive hedging is “attempting” to gain rope by additional income, that in theory may result in increase of balance when closing it out and temporary margin relief.
If the Margin level goes dangerously close to the level where you are not allowed by your broker to open positions, you should put on half a hedge immediately (if it is at 100%, make your move at 150%).
The stop of the half hedge should be at 6% loss of balance.
I can entrust this function on a cropper.

// Ratio Hedger by Macdulio for Automated Trading

#include <stdlib.mqh>
extern int magic_number = 51;
extern int magic_number2 = 52;
extern double Ratio = .8;
extern double MarginCallPercentage = 100;
#property copyright “by Macdulio in 2018”
#property link “https://forexfore.blog&#8221;
#property description “Ratio Hedger”
#property description “Clicks on half a hedge upon the Equity/Balance ”
#property description “Ratio dropping below the set value (at market)”
#property description “and another half 10% lower(at market)”
#property description “1/2 hedge also triggered by 150% of the set”
#property description “margin call level (by your broker)”

int profits;

double nakedshorts[];
double nakedlongs[];

double open_price;
double stop_loss_price;
double take_profit_price;

double OrderOpenPrice;
double OrderProfit;
string symbol = Symbol();
int init() {
return(0);
}

int deinit() {
return(0);
}

int start() {
int i, counter;
int counted_bars=IndicatorCounted();
int longcount, shortcount;
double nlongs;
double nshorts;
double longaveragebuffer;
double shortaveragebuffer;
int order_type;

profits = 0;
int hstTotal=OrdersHistoryTotal();

counter = 0;

for(i=OrdersTotal()-1; i>=0 ; i–)
{

if(OrderSelect(i,SELECT_BY_POS,MODE_TRADES)==false)
{
Print(“Access to orders list failed with error (“,GetLastError(),”)”);
break;
}
// if ( Symbol()==”EURUSD” && OrderStopLoss()==0 ) {
if (OrderType() == OP_BUY)
{
nlongs = nlongs+OrderLots();
longcount = longcount+1;
longaveragebuffer = longaveragebuffer+(OrderOpenPrice()*OrderLots());

}

if (OrderType() == OP_SELL )
{
nshorts = nshorts+OrderLots();
shortcount = shortcount+1;
shortaveragebuffer = shortaveragebuffer+(OrderOpenPrice()*OrderLots());
}
// }
}

double comparison = AccountEquity()/AccountBalance();

// Half Hedge for shorts
if (nlongs<nshorts && (comparison<Ratio || AccountMargin()<MarginCallPercentage*1.5) ) {

open_price = open_price = NormalizeDouble(Ask, Digits);
stop_loss_price = NormalizeDouble(0,Digits);
take_profit_price = NormalizeDouble(0,Digits);

for (i = OrdersTotal() – 1; i >= 0; i–)

if (OrderSelect(i, SELECT_BY_POS))
if (OrderMagicNumber() == magic_number) {
order_type = OrderType();
if (order_type == ORDER_TYPE_BUY) {
if ((NormalizeDouble(OrderOpenPrice(), Digits) != open_price) || (NormalizeDouble(OrderStopLoss(), Digits) != stop_loss_price) || (NormalizeDouble(OrderTakeProfit(), Digits) != take_profit_price)) {
if (!OrderModify(OrderTicket(), open_price, stop_loss_price, take_profit_price, OrderExpiration()))
Print(“Error: “, ErrorDescription(_LastError));

}
break;
}
else if (order_type == ORDER_TYPE_BUY)
break;
}
if (i < 0)
if (OrderSend(symbol, OP_BUY, NormalizeDouble((nshorts-nlongs)/2,2), open_price, 3, stop_loss_price, take_profit_price, “RATIO HEDGER HALF BUY 0/0”, magic_number) < 0)

Print(“Error: “, ErrorDescription(_LastError));
}
else
for (i = OrdersTotal() – 1; i >= 0; i–)

if (OrderSelect(i, SELECT_BY_POS))
if (OrderMagicNumber() == magic_number )
if (OrderType() == ORDER_TYPE_BUY_STOP)
if (!OrderDelete(OrderTicket()))
Print(“Error: “, ErrorDescription(_LastError));

// Full Hedge for shorts
if (nlongs<nshorts && comparison<Ratio-.1 ) {

open_price = open_price = NormalizeDouble(Ask, Digits);
stop_loss_price = NormalizeDouble(0,Digits);
take_profit_price = NormalizeDouble(0,Digits);

for (i = OrdersTotal() – 1; i >= 0; i–)

if (OrderSelect(i, SELECT_BY_POS))
if (OrderMagicNumber() == magic_number2) {
order_type = OrderType();
if (order_type == ORDER_TYPE_BUY) {
if ((NormalizeDouble(OrderOpenPrice(), Digits) != open_price) || (NormalizeDouble(OrderStopLoss(), Digits) != stop_loss_price) || (NormalizeDouble(OrderTakeProfit(), Digits) != take_profit_price)) {
if (!OrderModify(OrderTicket(), open_price, stop_loss_price, take_profit_price, OrderExpiration()))
Print(“Error: “, ErrorDescription(_LastError));

}
break;
}
else if (order_type == ORDER_TYPE_BUY)
break;
}
if (i < 0)
if (OrderSend(symbol, OP_BUY, NormalizeDouble(nshorts-nlongs,2), open_price, 3, stop_loss_price, take_profit_price, “RATIO HEDGER BUY 0/0”, magic_number2) < 0)

Print(“Error: “, ErrorDescription(_LastError));
}
else
for (i = OrdersTotal() – 1; i >= 0; i–)

if (OrderSelect(i, SELECT_BY_POS))
if (OrderMagicNumber() == magic_number2 )
if (OrderType() == ORDER_TYPE_BUY_STOP)
if (!OrderDelete(OrderTicket()))
Print(“Error: “, ErrorDescription(_LastError));

// Half Hedge For Longs
if (nshorts<nlongs && (comparison<Ratio || AccountMargin()<MarginCallPercentage*1.5)) {

open_price = NormalizeDouble(Bid, Digits);
stop_loss_price = NormalizeDouble(0,Digits);
take_profit_price = NormalizeDouble(0,Digits);
for (i = OrdersTotal() – 1; i >= 0; i–)
if (OrderSelect(i, SELECT_BY_POS))
if (OrderMagicNumber() == magic_number) {
order_type = OrderType();
if (order_type == ORDER_TYPE_SELL) {
if ((NormalizeDouble(OrderOpenPrice(), Digits) != open_price) || (NormalizeDouble(OrderStopLoss(), Digits) != stop_loss_price) || (NormalizeDouble(OrderTakeProfit(), Digits) != take_profit_price)) {
if (!OrderModify(OrderTicket(), open_price, stop_loss_price, take_profit_price, OrderExpiration()))
Print(“Error: “, ErrorDescription(_LastError));
}
break;
}
else if (order_type == ORDER_TYPE_SELL)
break;
}
if (i < 0)
if (OrderSend(symbol, OP_SELL, NormalizeDouble((nlongs-nshorts)/2,2), open_price, 3, stop_loss_price, take_profit_price, “RATIO HEDGER HALF SELL 0/0”, magic_number) < 0)
Print(“Error: “, ErrorDescription(_LastError));
}
else
for (i = OrdersTotal() – 1; i >= 0; i–)
if (OrderSelect(i, SELECT_BY_POS))
if (OrderMagicNumber() == magic_number)
if (OrderType() == ORDER_TYPE_SELL_STOP)
if (!OrderDelete(OrderTicket()))
Print(“Error: “, ErrorDescription(_LastError));

// Full Hedge For Longs
if (nshorts<nlongs && comparison<Ratio-.1) {

open_price = NormalizeDouble(Bid, Digits);
stop_loss_price = NormalizeDouble(0,Digits);
take_profit_price = NormalizeDouble(0,Digits);
for (i = OrdersTotal() – 1; i >= 0; i–)
if (OrderSelect(i, SELECT_BY_POS))
if (OrderMagicNumber() == magic_number2) {
order_type = OrderType();
if (order_type == ORDER_TYPE_SELL) {
if ((NormalizeDouble(OrderOpenPrice(), Digits) != open_price) || (NormalizeDouble(OrderStopLoss(), Digits) != stop_loss_price) || (NormalizeDouble(OrderTakeProfit(), Digits) != take_profit_price)) {
if (!OrderModify(OrderTicket(), open_price, stop_loss_price, take_profit_price, OrderExpiration()))
Print(“Error: “, ErrorDescription(_LastError));
}
break;
}
else if (order_type == ORDER_TYPE_SELL)
break;
}
if (i < 0)
if (OrderSend(symbol, OP_SELL, NormalizeDouble(nlongs-nshorts,2), open_price, 3, stop_loss_price, take_profit_price, “RATIO HEDGER SELL 0/0”, magic_number2) < 0)
Print(“Error: “, ErrorDescription(_LastError));
}
else
for (i = OrdersTotal() – 1; i >= 0; i–)
if (OrderSelect(i, SELECT_BY_POS))
if (OrderMagicNumber() == magic_number2)
if (OrderType() == ORDER_TYPE_SELL_STOP)
if (!OrderDelete(OrderTicket()))
Print(“Error: “, ErrorDescription(_LastError));

return(0);
}

Last Minute Ideas – An Auto-Trading Article

It’s no secret that I am developing my auto trading routines for one pair only, the EUR/USD.

Low spread (0.22 pips average ) helps, and so does liquidity: it is being kept to predictability by the large number of traders trading it. Just like the S&P, that is always quoted as a “Benchmark”.

I have come to know some of its characteristics, and I am pretty certain of its Fluctuation Size.

God Awesome is now at V1.4, and the release is getting a delay.

I just implemented the “LEMA continuation trade plot” – both for longs and shorts, extended the Buy/Sell strokes out to their expiration size and included a new trade as well.

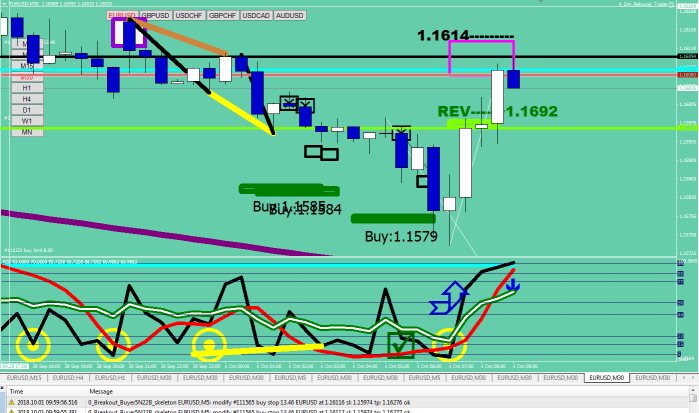
The Sharpie Quick Trade has the same trigger as the Sharpie Trade Initiator, but while the latter one is posting limit orders betting on a counter move to spring about from 1/3 Fluctuation Size out, the Quick Trade is betting on a hurl in the current direction, to the extent of 1/4 Fluctuation Size. Yes, we’re talking 8 pips, just where the auto trail stop would put out the 1-pip protective stop loss from the open.

While tying off loose ends, one thing I noticed was an amateur mistake I made. Somehow, when I switched away from at market opening, I ended up with the wrong opening price:

open_price = NormalizeDouble(iClose(symbol,30,0)-FSize/2*10*Point, Digits);

the 0 in bold basically guarantee the trade being pushed out as long as the trade opening condition persists. As you can see below, sharpie 91 had its buy level crossed, yet there was no fill, because of the bad calculation. Copy and paste can close problems at times.

The 0, that was supposed to be 1, pushed the limit order to 1.15725 instead of 1.1579 and so it never got filled. Close[0] is simply the current price.

EUR1201

The second mistake I had to address today, was about the Sharpie Quick trade, that has the “X” plot boxes – showing the trigger level and 0-2 candles out you would see their minimum target.

The current trade, that is about to be stopped out, was opened too late. As a response, I had to decrease the expiration value from 9000 seconds – which was 5 candles out to 3 candles away:

int ClosePendingInSeconds = 5400;


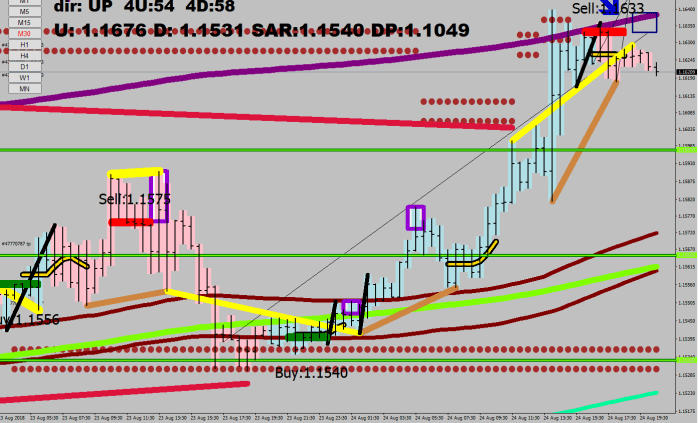
And yes, on the above snapshot you can see the PSAR trader waiting for the ball with an overwhelming volume size. It is a projected 4H PSAR reading that becomes active upon long time no see. 1.1624 – is the rounded short value.

The Reversion To Mean plot is not very encouraging to shorts, and the so the BRGR EA routine (Break/Return Green River) should have opened a long at the strike out, at market, and it didn’t. Another screen plot / EA syncing error I need to look into.

Welcome to a normal day in automated trading.

P.S.: the broker this account is with isn’t listed by Forex Factory, so I sent them a mail.


Later…

PSAR Trader’s order expired, Breakout buyer is lining up for a possible go.

EUR1202

As for BRGR – it seems like I included a filter – due some back testing presumably –

MathAbs(iHi-Close[0])>FMax*10*Point

that is either unnecessary, or does not have the distance right; it certainly prevented a long open that would be making money already, so I commented it out.

How To Write an Auto-Trading Routine?

First you need to notice a feature that seems to repeat itself.

Feature

The feature I found today was a sell signal.

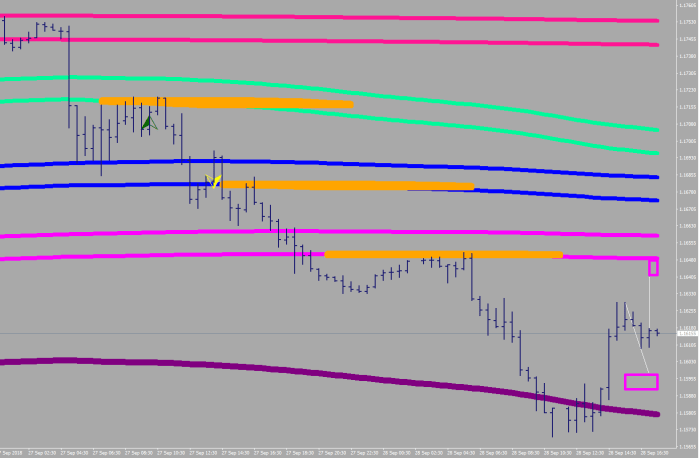
Once you had 3 closes below a LEMA – and price was residing on the other side earlier -, you would start looking at a short sell starting 4 bars out. The short entry level is given: the low of the LEMA, and your stop can be put at the top of the LEMA.

So let’s make a screen plot for the sell condition – and include it in the God Awesome indicator – of course!

Feature_

(Oranged out for the sell level.)


//expiration 16 hours out

int ClosePendingInSeconds = 57600;

// You’ll need considerate sizing – meaning based on current equity size

extern double AF = 0.35;

for(i=OrdersTotal()-1; i>=0 ; i–)
{

if(OrderSelect(i,SELECT_BY_POS,MODE_TRADES)==false)
{
Print(“Access to orders list failed with error (“,GetLastError(),”)”);
break;
}
if (OrderType() == OP_BUY)
{
nlongs = nlongs+OrderLots();
longcount = longcount+1;
longaveragebuffer = longaveragebuffer+(OrderOpenPrice()*OrderLots());

}

if (OrderType() == OP_SELL )
{
nshorts = nshorts+OrderLots();
shortcount = shortcount+1;
shortaveragebuffer = shortaveragebuffer+(OrderOpenPrice()*OrderLots());

}
}

double equity=NormalizeDouble(AccountEquity()/1000*.9*AF,2);
double currentsize;

if (nlongs>nshorts) currentsize=nlongs;
else currentsize=nshorts;

double difference = equity-currentsize;


//Target distance calculation based on 3-period daily average true range (plus 30%)

//I used simple math to save on run time by avoiding a cycle

double ATRAVG=((iATR(NULL,1440,14,1)+iATR(NULL,1440,14,2)+iATR(NULL,1440,14,3))/3*1.3);

string symbol = Symbol();

int LEMA=414;
// Sell

if ( iClose(symbol,30,1)<iMA(symbol,30,LEMA,0,MODE_EMA, PRICE_LOW,1) &&
iClose(symbol,30,5)<iMA(symbol,30,LEMA,0,MODE_EMA, PRICE_CLOSE,5) &&
iClose(symbol,30,6)<iMA(symbol,30,LEMA,0,MODE_EMA, PRICE_CLOSE,6) &&
iClose(symbol,30,7)<iMA(symbol,30,LEMA,0,MODE_EMA, PRICE_CLOSE,7) &&
iClose(symbol,30,20)>iMA(symbol,30,LEMA,0,MODE_EMA, PRICE_HIGH,20) &&
iClose(symbol,30,21)>iMA(symbol,30,LEMA,0,MODE_EMA, PRICE_HIGH,21) &&
iClose(symbol,30,22)>iMA(symbol,30,LEMA,0,MODE_EMA, PRICE_HIGH,22)
)
{

open_price = NormalizeDouble(iMA(symbol,30,LEMA,0,MODE_EMA, PRICE_LOW,1), Digits);
stop_loss_price = NormalizeDouble(iMA(symbol,30,LEMA,0,MODE_EMA, PRICE_HIGH,1)+(iMA(symbol,30,LEMA,0,MODE_EMA, PRICE_HIGH,1)-iMA(symbol,30,LEMA,0,MODE_EMA, PRICE_HIGH,1)), Digits);
take_profit_price = NormalizeDouble(open_price – ATRAVG , Digits);

for (i = OrdersTotal() – 1; i >= 0; i–)
if (OrderSelect(i, SELECT_BY_POS))
if (OrderMagicNumber() == magic_number) {
order_type = OrderType();
if (order_type == ORDER_TYPE_SELL_LIMIT) {
if ((NormalizeDouble(OrderOpenPrice(), Digits) != open_price) || (NormalizeDouble(OrderStopLoss(), Digits) != stop_loss_price) || (NormalizeDouble(OrderTakeProfit(), Digits) != take_profit_price)) {
// if (!OrderModify(OrderTicket(), open_price, stop_loss_price, take_profit_price, OrderExpiration()))
Print(“Error: “, ErrorDescription(_LastError));
}
break;
}
else if (order_type == ORDER_TYPE_SELL)
break;
}
if (i < 0)
if (OrderSend(NULL, OP_SELLLIMIT, lots, open_price, 3, stop_loss_price, take_profit_price, magic_number+” LEMA SELL @ RSI “+DoubleToString(iRSI(NULL,0,2,PRICE_MEDIAN,0),2), magic_number,1) < 0)
Print(“Error: “, ErrorDescription(_LastError));
}
else
for (i = OrdersTotal() – 1; i >= 0; i–)
if (TimeCurrent()-OrderOpenTime()>=ClosePendingInSeconds)
if (OrderSelect(i, SELECT_BY_POS))
if (OrderMagicNumber() == magic_number)
if (OrderType() == ORDER_TYPE_SELL_LIMIT)
if (!OrderDelete(OrderTicket()))
Print(“Error: “, ErrorDescription(_LastError));


That’s about 80% of what you will need.

The next step is to download and plug in the historical data you would need for the back testing. Additional filters may be needed of course. That is what back testing is for.

Cheerio,

automatix

Fulliautomatix

EUR1198

Evaluation of the Sophistication

Automated trading comes with filters. I can show you a couple with today’s 3 trades.

Trading

I know, these are 2 trades. There was a 3rd one that did not happen. One by one then.

EUR1192

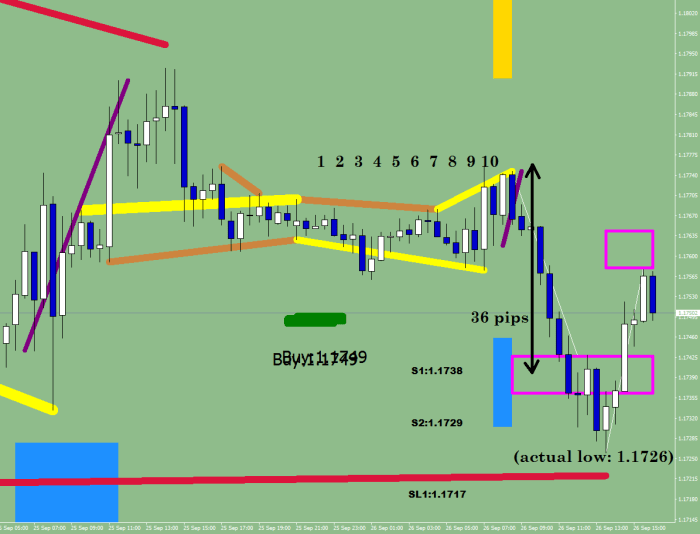
  1. The first trade, that says “cancelled” – it was opened by the 91 Sharpie routine, as a Buy Limit order. I set an expiration of 10 hours for the buy order (check the open and the close time stamps!): price had to attack that line in order for me wanting to be a buyer. It didn’t. It consolidated too long; this was a defense mechanism that protected the trade.
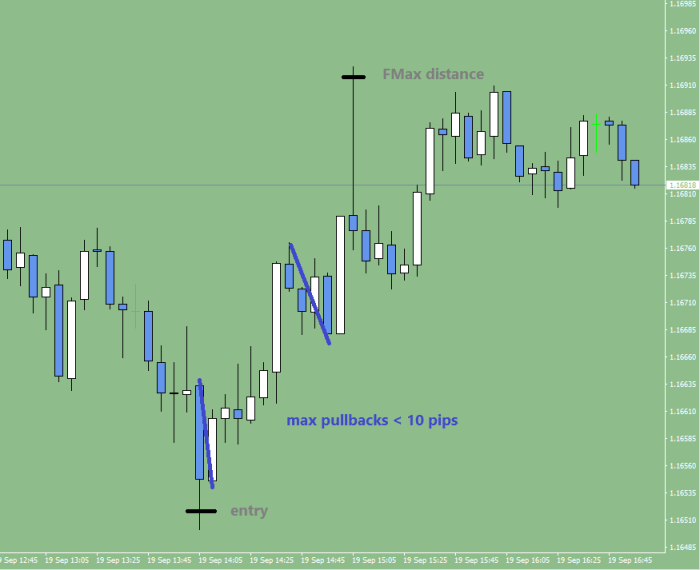
  2.  The second trade would had appeared at 1.1738 – but it did not. Why? Because of the following filter I added yesterday: buylevel<iHigh(Symbol(),0,iHighest(Symbol(),30,MODE_HIGH,10,0))-FMax*10*Point what does this do? It verifies that the 10 sample 30-minute high is minimum Fluctuation Maximum away. It wasn’t. 36 pips is less than 38. Why this protection? You can get an idea if price has traveled enough to be able to buy. And you are holding off on the measurement till the last minute by not posting a limit order, but by buying at market if the conditions were met.
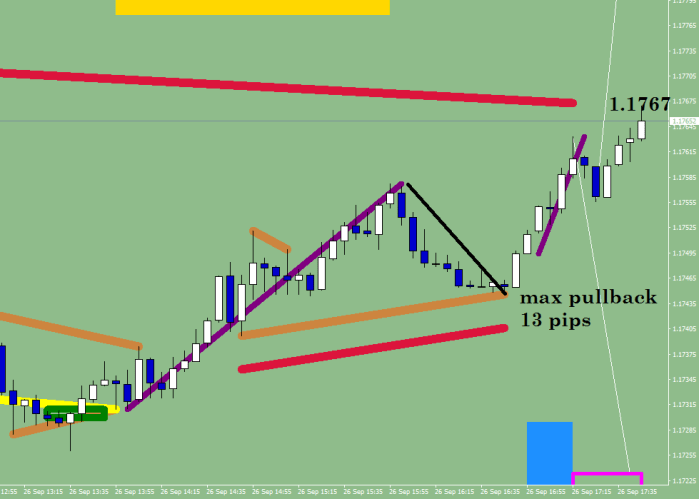
  3. The 1.1729 trade was merely 3 pips away from the actual low. I’m going to increase the size of this one, but it was by all means the right trade. Its target was 1.17673 – which did not happen. What should had happened was a stop out by my intelligent trail stop 12 pips below at 1.1745, clocking in a gain of 16 pips.

I could not resist cutting the trade again.

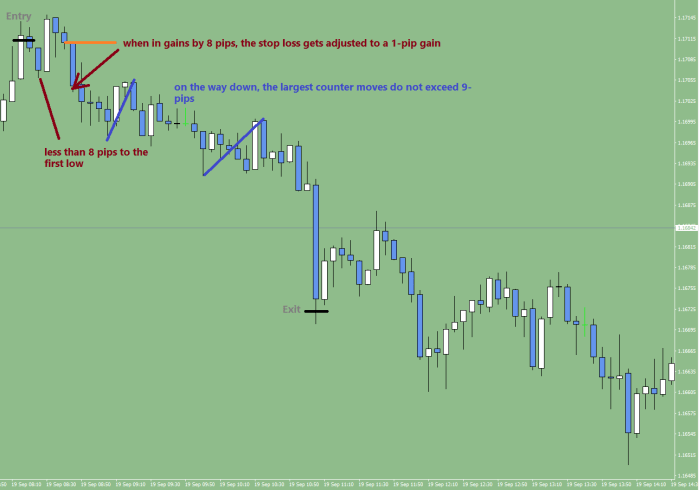
What was I thinking? That the Green River is nearby, and it would dip lower and my Green River buyer routine should open a buy. It did not dip any more. Overthinking is futile. As soon as the trade was 8 pips positive, the auto trail stop would had turned it into a free trade by putting the stop loss one pip above the open.

I am the weakest link in the system, that is not only self sustaining but emotionless and much more efficient in every single way. Of course, I am still in this somehow. I figured out what needed to be done, I picked the filters, and none of the system would exist without me. I am the Alpha, and my system is the Omega.

…maybe I would make one change after all to the stop loss…

EUR1193

I should… perhaps… put back the trail stop value to 1/2 the Fluctuation Size.

Is Your Trail Stop Smart Enough?

Let’s evaluate the 2 trades that transpired today.

Trail

4% gains for the day, not bad, right?

The two routines, 95 End Line Trader and 94 Green River Trader picked the best spots.

What was missing? The free trade.

Let me explain.

Say, I had widened my idea from one specific routine (93 Weight Breaker) to all the trades – namely to adjust the stop loss to 1 pips positive upon exceeding 8 pips in gains  to cover the commission…

I already have the following trail stop piece, that puts a trail stop 1/2 fluctuation size back from the current 30-minute high/low upon exceeding 20 pips in profits…


for(i=OrdersTotal()-1; i>=0 ; i–){
if(OrderSelect(i,SELECT_BY_POS,MODE_TRADES)==false)
{
Print(“Access to orders list failed with error (“,GetLastError(),”)”); break;
}

if (OrderType() == OP_BUY && OrderMagicNumber()!=exempt_magic_number )
if (iHigh(symbol,30,0)-200*Point > OrderOpenPrice() && (iHigh(symbol,30,0)-FSize/2*10*Point > OrderStopLoss() || OrderStopLoss()==0) )
{
Print(“bUY sTOP lOSS ATTEMPT “, OrderTicket());
if (!OrderModify(OrderTicket(), OrderOpenPrice(), NormalizeDouble(iHigh(symbol,30,0)-FSize/2*10*Point,6), OrderTakeProfit(), Red))
Print(“Error setting Buy trailing stop: “, GetLastError());
}
if (OrderType() == OP_SELL && OrderMagicNumber()!=exempt_magic_number)
if (iLow(symbol,30,0)+200*Point < OrderOpenPrice() && (iLow(symbol,30,0)+FSize/2*10*Point < OrderStopLoss() || OrderStopLoss()==0) )
{
Print(“sELL sTOP lOSS ATTEMPT “, OrderTicket());
if (!OrderModify(OrderTicket(), OrderOpenPrice(), NormalizeDouble(iLow(symbol,30,0)+FSize/2*10*Point,6), OrderTakeProfit(), Red))
Print(“Error setting Sell trailing stop: “, GetLastError());
}}


What if I added the free trade…?

if (OrderType() == OP_BUY)
if ((iHigh(symbol,5,0)-FSize/4*10*Point> orderstoploss || (iHigh(symbol,5,0)-FSize/4*10*Point> OrderOpenPrice() && orderstoploss==0) || ( iHigh(symbol,5,0)-10*Point> OrderOpenPrice() && TimeCurrent()-OrderOpenTime()>=18000)) && (iHigh(symbol,5,0)-FSize/3*10*Point< OrderOpenPrice())){
Print(“bUY sTOP lOSS ATTEMPT “, OrderTicket());
if (!OrderModify(OrderTicket(), OrderOpenPrice(), NormalizeDouble(OrderOpenPrice()+10*Point,6), OrderTakeProfit(), Red))
Print(“Error setting Buy trailing stop: “, GetLastError());
}
if (OrderType() == OP_SELL)
if ((iLow(symbol,5,0)+FSize/4*10*Point < orderstoploss || (iLow(symbol,5,0)+FSize/4*10*Point<OrderOpenPrice() && orderstoploss==0) || (iLow(symbol,5,0)+10*Point<OrderOpenPrice() && TimeCurrent()-OrderOpenTime()>=18000)) && (iLow(symbol,5,0)+FSize/3*10*Point>OrderOpenPrice())) {
//
Print(“sELL sTOP lOSS ATTEMPT “, OrderTicket());
if (!OrderModify(OrderTicket(), OrderOpenPrice(), NormalizeDouble(OrderOpenPrice()-10*Point,6), OrderTakeProfit(), Red))
Print(“Error setting Sell trailing stop: “, GetLastError());
}

if (OrderType() == OP_BUY && OrderMagicNumber()!=exempt_magic_number )
if (iHigh(symbol,5,0)-FSize/2*10*Point > OrderStopLoss() && (iHigh(symbol,5,0)-200*Point > OrderOpenPrice() || (iHigh(symbol,5,0)-200*Point > OrderOpenPrice() && OrderStopLoss()==0)) )
{
Print(“bUY sTOP lOSS aTTEMPT “, OrderTicket());
if (!OrderModify(OrderTicket(), OrderOpenPrice(), NormalizeDouble(iHigh(symbol,5,0)-FSize/2*10*Point,6), OrderTakeProfit(), Red))
Print(“Error setting Buy trailing stop: “, GetLastError());
}
if (OrderType() == OP_SELL && OrderMagicNumber()!=exempt_magic_number)
if (iLow(symbol,5,0)+FSize/2*10*Point < OrderStopLoss() && (iLow(symbol,5,0)+200*Point < OrderOpenPrice() || (iLow(symbol,5,0)+200*Point <OrderOpenPrice() && OrderStopLoss()==0)) )
{
Print(“sELL sTOP lOSS aTTEMPT “, OrderTicket());
if (!OrderModify(OrderTicket(), OrderOpenPrice(), NormalizeDouble(iLow(symbol,5,0)+FSize/2*10*Point,6), OrderTakeProfit(), Red))
Print(“Error setting Sell trailing stop: “, GetLastError());
}


Trade 1:

Trail01

With the Free Trade add on, and with making this routine exempt from the Fluctuation Stop Loss Fitter, the trade would had gone to its target making 38.4 pips in gains instead of 11.4 pips, yielding $952 instead of $282. The maximum heat on this trade was 2.2 pips because of the otherwise perfect entry.

Trail02

Now, for the second trade, which I closed prematurely, the alternate route could had been the following: once the free trade is running there is no danger of losing on the trade. Two possible outcomes: when changing nothing, the 1/2 fluctuation trail stop could had closed the trade at 1.1676, or 16 pips away from the high, for 25 pips profits instead of 3.5 pips, which would had brought the profits from 185.15 to 1,322.50 – or route 2, on top of the free trade, better target choice – the Guard rail, fluctuation Maximum away would had brought the total move length to 39.9 pips, or the profits to 2,110.71.

Needless to say, this auto trading routine had worked perfectly also in terms of getting the entry right, which was 1 pip below the Green River high. The heat was less than 1.5 pips.

$3,062.71 was the potential gain for the 2 trades without increasing their initial sizes, which comes out to be about 26% gains for the day.

Trail03

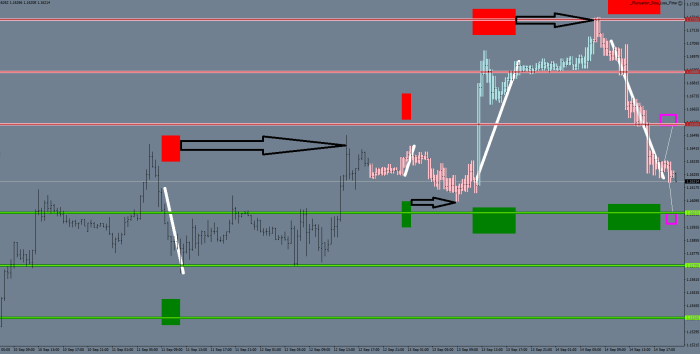
End Line Theory

the market prints an end line (white ones)

now you have a support and a resistance box

you play whichever gets touched first for an entry

EUR1181

for examplar…

while (j2<500 ){
j=j2+FMinimumSampleSize;
if (iFractals(Symbol(),0,MODE_LOWER,j2))
while (j<j2+22){
if (iFractals(Symbol(),0,MODE_LOWER,j2) && RSI2[j2]<8 && stoch[j2]<30 && stoch[j]>44 && High[j]-Low[j2]<FMax*3*10*Point && High[j]-Low[j2]>FMax*10*Point/divider && RSI[i2]>15) break;
j=j+1;
}
if (j2<j+12 && iFractals(Symbol(),0,MODE_LOWER,j2) && RSI2[j2]<8 && stoch[j2]<30 && stoch[j]>44 && High[j]-Low[j2]<FMax*3*10*Point && High[j]-Low[j2]>FMax*10*Point/divider && RSI[i2]>15) break;

j2++;}
if (iFractals(Symbol(),0,MODE_LOWER,j2) && RSI2[j2]<8 && stoch[j2]<30 && stoch[j]>44 && High[j]-Low[j2]<FMax*3*10*Point && High[j]-Low[j2]>FMax*10*Point/divider && RSI[i2]>15) {LowFractalTime_2=iTime(NULL, 0,j2-1); LowFractalTime_1=iTime(NULL, 0,j-1); direction[j2]=1; }


the end line support and resistance boxes are now part of the God Awesome Indicator

that is due to be released by the last day of September, 2018


could this be a basis for an automated trading routine?

anything could be, but writing this would be a breeze

Using the 88-Luftballons SA

The market turns in one of 2 ways:

  1. By making a Head and a Shoulder
  2. In a rising/falling wedge

The 88 Luftballons MT4 indicator can help you find the first condition. (The God Awesome indicator can help you with the second one, that involves plotting terminal waves.)

The SA in the title stands for Sync and A-Sync.

I call a Low/High Synchronized if it is both short and medium term oversold/overbought.

The Sync Lows/Highs have a visual representation of an 8-Ball.

The 8-balls are tough cookies, they are hard to break, and they could all be Heads potentially.

To turn them into actual heads, you need an A-Sync reading following in close behind (11-14 samples are used for the 30 minutes charts).

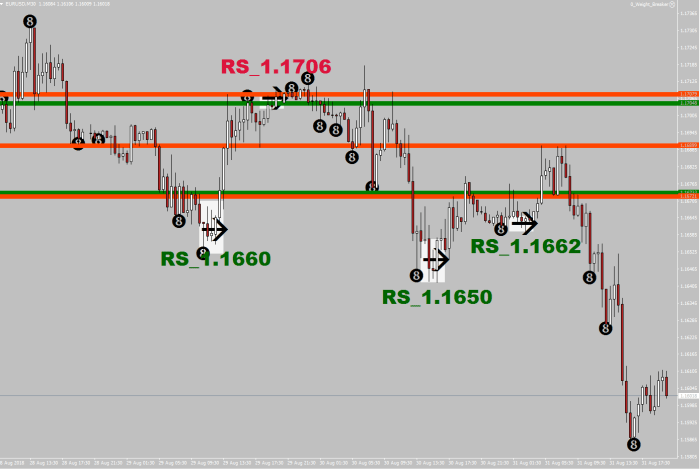
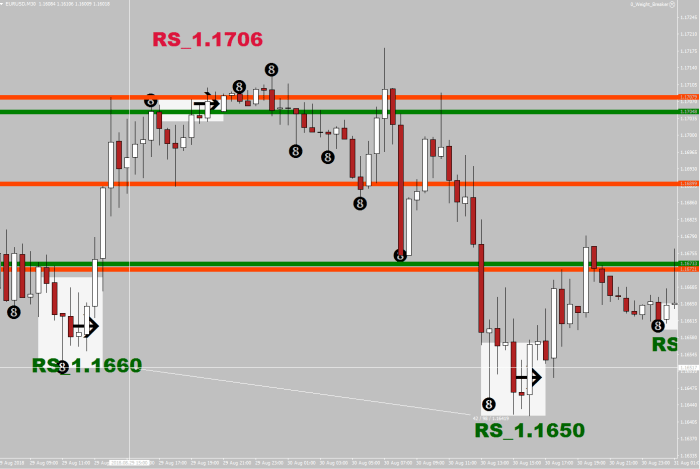
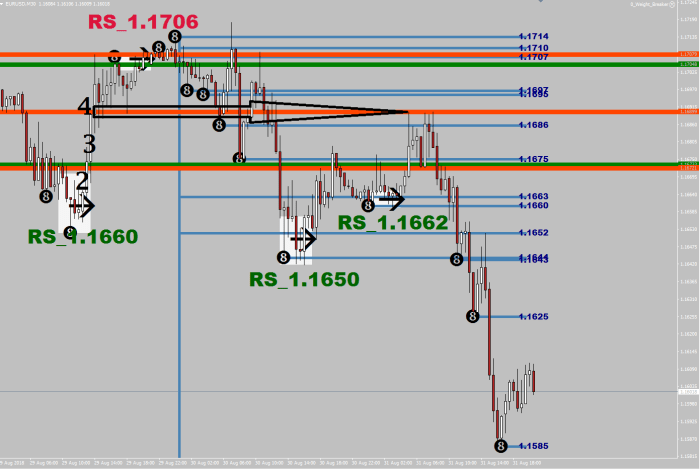
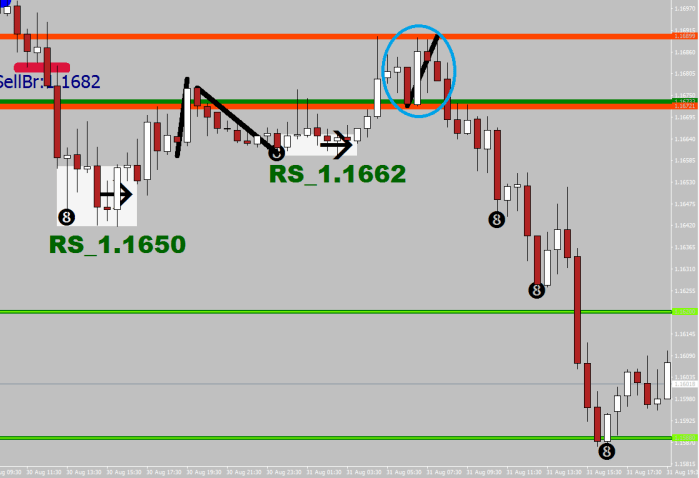
The A-Sync reading has two visual representations. One is the black arrow that is plotted at the weight (HL2) value of the 30-minute bar. The other is the red/green text starting with “RS” (Right Shoulder), repeating the HL2 reading with numbers.

88_4

If you look at the picture above, the first thing you would spot – most likely are the white-out areas. These go from the HL2 value to the recent high/low, and they are 8 periods wide – to make them as visible as possible. They mean to get your attention to the areas where there was a divergence made by buying/selling.

There is one more thing that you can figure easily: where the stops were placed.

88_5

88_6

Both on the upside and on the downside the stops were within 10 pips distance from the previous high/low. This may be a useful information about the current market players.

As for the lines, the green line shows the limit of the push achieved by the purchase at the right shoulder – with 2 hours time limit given.

The red-orange line of course is the 2-hour achievement of the right shoulder provider bears.

The idea of the colors is that the red line is a potential sell, the green line is a potential buy.

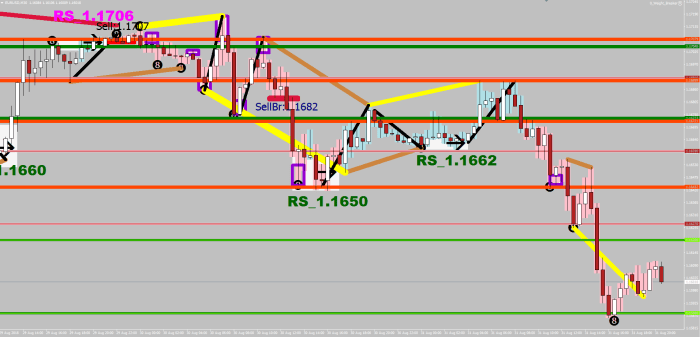
The last image shows how that 2-hour print becomes an active sell further down the road. You can also see that the 8-Ball lines / Sync values can be optionally plotted in a form of a mesh, and the actual numbers are an additional option.

88_7

If you are interested in purchasing this or any other of my indicators or an automated trading routine, feel free to contact me: macdulio@yahoo.com

Bonus image:

The terminal wave, as Mr. God Awesome can find it…

EUR1158

Full Color Jacket: 88 Luftballons SA + God Awesome V1.1

EUR1159

How To Determine the Fluctuation Size?

1. Open the chart of the instrument you want to be gauging for.

2. Switch to 30 Minutes

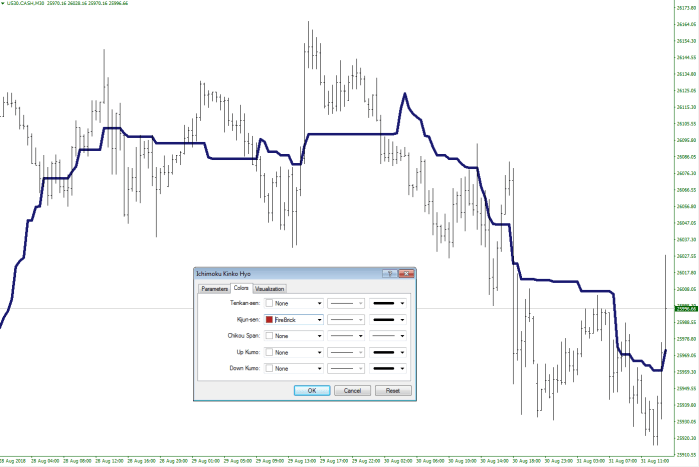
3. Plot a Kijun-sen by adding Ichimoku indicator to the chart

DOW

(you can flag None for all the other items, so they don’t get displayed)

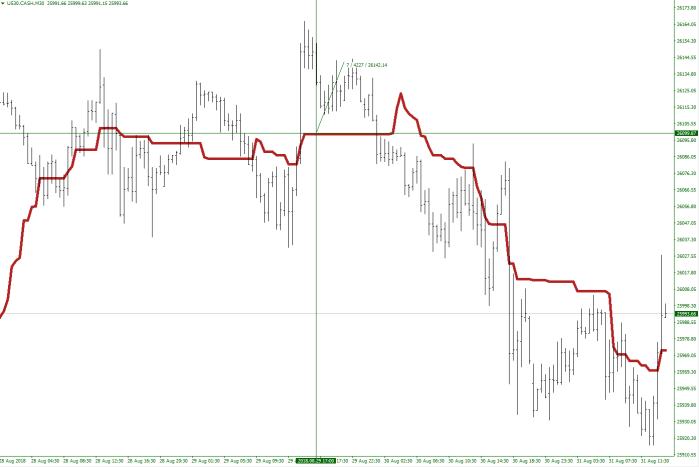
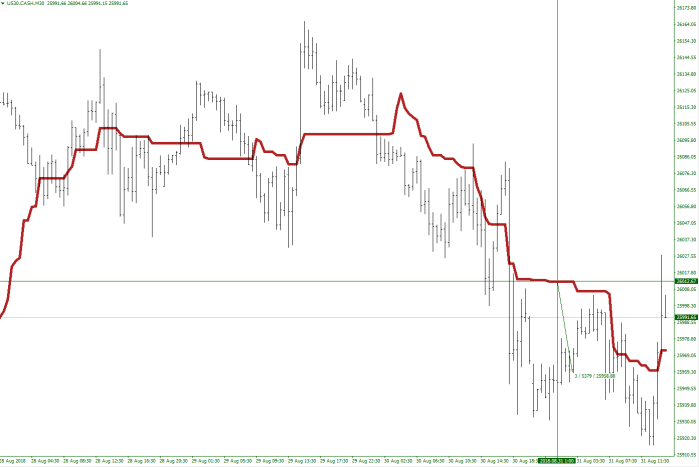
4. Find periods where the Kijun-sen runs flat

5. Click on the target marker (crosshair) icon

6. Start measuring where the Kijun-sen has been flat for 3+ periods and price seems to be finding resistance.

DOW2

DOW3

Based on the above readings, 1/2 of the fluctuation zone is somewhere between 42.00 and 53.00. With a few more measurements, I would conclude the FSize (Fluctuation Zone Size) to be 51.00×2= 102

Meet Mr. Morten Market

Atlas3

Yes, the market is an Atlas ball. If you did not know this, from now you would.

It is currently sitting idle – as per our stock picture.

Two forces shall try to press on it in the opposite directions in a minute.

Imagine two hands. One gives a push from one direction. The ball wobbles a bit and settles back down somewhere in its nest/pit.

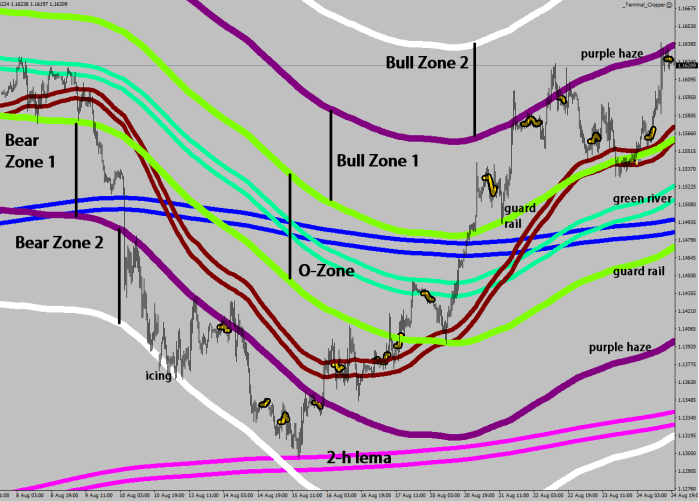
The nest is approximately between the chartreuse lines – they represent the high points, the edges of the pit. Decision time, was the fore strong enough to push it over the edge? If so, the ball rolls.

I never had much faith in moving averages, I was not looking for moving averages. This is why I managed to find the right one.

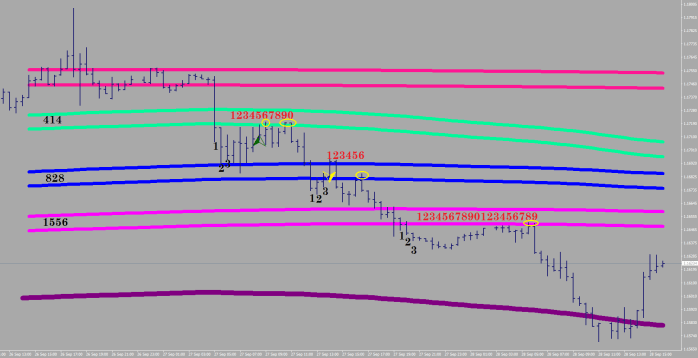
The right one of course is the green river, that has been with me for a while. It is the 15-minute lema, or if you are on 30 minutes – like I am, it is the 414 sample high and low EMA.

The chartreuse is the edge of the pit. It is 1x Fluctuation Maximum away from the banks of the green river.

The fluctuation is instrument dependent and currently I figure it as 6/5 of  the Fluctuation Zone.

The Fluctuation Zone is a constant and volatility has no effect on it.

You get to change this value for your instrument in the latest LEMA 30.

EUR1152

_LEMA_30

My current thinking of the outer zones: bulls are strong in Zone 1; as soon as price is pushed over the edge, they have 26x 30 minutes of free play time to roll with it.

In Zone 2, if they manage to push the ball a bit outside of Zone 1, there is some extended time play to be had, but the ground is flat, which does not help the pushing force; bulls would have 7x 30 minutes to force the ball further without the slope.

As you can figure from all of the above, bears would have a hard time at the cusp of the pit to push it back into the pit part. The second picture shows such attempt that failed very recently.

For additional information, I placed the Purple Haze 3x Fluctuation Max distance from the Green River and the Icing 5x Fluctuation Max away.

How does it feel be in picture finally?

EUR1153

My God Awesome Indicator was updated accordingly.